1. Goal
- 비밀번호 입력 시 길이에 따른 보안성 항목 추가
2. Using
- HTML
- Javascript
3. Source Code
|
1
2
3
4
5
6
7
8
9
10
11
12
13
14
15
16
17
18
19
20
21
22
23
24
25
26
27
28
29
30
31
32
33
34
35
36
37
38
39
40
41
42
43
44
45
46
47
48
49
50
51
52
53
54
55
56
57
58
59
60
61
62
63
64
65
66
67
68
69
70
71
72
|
<!DOCTYPE html>
<html>
<head>
<meta charset="utf-8">
<title>젊은이여 그대의 이름을 가치있게 하라</title>
</head>
<script>
function check_pw(){
var pw = document.getElementById('pw').value;
var SC = ["!","@","#","$","%"];
var check_SC = 0;
if(pw.length < 6 || pw.length>16){
document.getElementById('pw_pro_label').innerHTML ='비밀번호는 6글자 이상, 16글자 이하만 이용 가능합니다.';
document.getElementById('pw_pro').value='0';
return;
}
for(var i=0;i<SC.length;i++){
if(pw.indexOf(SC[i]) != -1){
check_SC = 1;
}
}
if(check_SC == 0){
document.getElementById('pw_pro_label').innerHTML = '비밀번호에 !,@,#,$,% 의 특수문자를 포함시켜야 합니다.'
return;
}
document.getElementById('pw_pro_label').innerHTML = '';
if(pw.length < 8){
document.getElementById('pw_pro').value='1';
}
else if(pw.length<12){
document.getElementById('pw_pro').value='2';
}
else{
document.getElementById('pw_pro').value='3';
}
if(document.getElementById('pw').value !='' && document.getElementById('pw2').value!=''){
if(document.getElementById('pw').value==document.getElementById('pw2').value){
document.getElementById('check').innerHTML='비밀번호가 일치합니다.'
document.getElementById('check').style.color='blue';
}
else{
document.getElementById('check').innerHTML='비밀번호가 일치하지 않습니다.';
document.getElementById('check').style.color='red';
}
}
}
</script>
<style>
td{padding:5px;}
</style>
<body>
<table>
<tr>
<td width="5%" align="center">*</td>
<td width="20%">아이디</td>
<td><input type="text" name ="userId" id="id"></td>
</tr>
<tr >
<td width="5%" align="center">*</td>
<td width="20%">비밀번호</td>
<td><input type="password" name="userPW" id="pw" onchange="check_pw()"> <span style="color:cadetblue">보안성</span> <progress id="pw_pro" value="0" max="3"></progress> <span id="pw_pro_label"></span></td>
</tr>
<tr>
<td width="5%" align="center">*</td>
<td width="20%">비밀번호 확인</td>
<td><input type="password" name="userPW2" id="pw2" onchange="check_pw()"> <span id="check"></span></td>
</tr>
</table>
</body>
</html>
|
cs |
4. Explanation
1부와 소스코드가 비슷하니 추가된 부분만 간단하게 설명하도록 하겠다.
참고로 비밀번호 조건을 확인하는 부분의 조건문 내에 return 문을 추가해주었다고 한다. (가독성(?)을 위해...)
|
63
|
<td><input type="password" name="userPW" id="pw" onchange="check_pw()"> <span style="color:cadetblue">보안성</span> <progress id="pw_pro" value="0" max="3"></progress> <span id="pw_pro_label"></span></td>
|
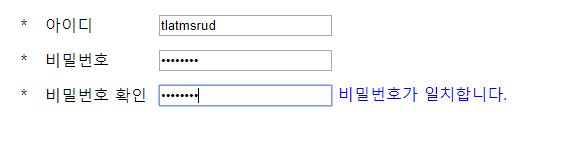
63번 라인에 <span style="color:cadetblut">보안성</span>은
보안성이라는 글자 + 스타일을 입히기 위해서 삽입해주었다.
<progress> 태그는 진행 정도를 아래와 같이 출력시키는 것이다.

봐줄만하다.(?)
<progress> 태그의 속성은
id, value, max가 있는데
max는 그려질 바(bar)에 대한 최대값
value는 현재 값이다.
위의 그림에서는 max = "3", value="2" 인 상태이기 때문에 약 66.6%의 영역이 색칠되어져 있다.
그럼 script문에서 이 value값만 컨트롤할수 있다면? (@_@)
아참 pw_pro_label은 bar에 대한 간단한 설명을 넣기 위한 id였는데! 사용하지 않았으므로 무시해주길 바란다.
script문은 정말쉽다. 추가된 부분은 아래와 같다.

일단 비밀번호에 대한 조건이 충족되지 않으면 pw_pro의 value값을 0으로 설정한다.
그럼 당연히 bar는 빈상태가 될것이다.
비밀번호에 대한 조건을 충족시킨 상태에서 비밀번호의 길이가 6~7자 사이일 시 value에 1을
8~11자 사이일 시 2를
12~16자 사이일 시 3을 입력해줌으로 써 <progress> 태그를 컨트롤 하였다.
(@_@)!
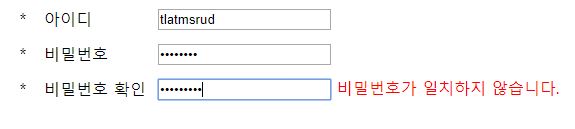
5. Result

6. Feelings
HTML을 배우면서 갑자기 뜬금! 궁금한게 생기곤 했는데 그중 하나가 이 부분이었다.
공부를 하고 나니 생각보다 구현하기 쉬웠다.
(@_@)
'프론트엔드 > 기타' 카테고리의 다른 글
| [WEB] Ajax 통신 시 한글 깨짐 현상(???, 특수문자) (0) | 2019.08.19 |
|---|---|
| [WEB] Servlet - Ajax 통신하기(이클립스, tomcat, web.xml) (0) | 2019.08.19 |
| [WEB] 2. 회원가입 비밀번호 조건 및 일치 여부 확인 1 (2) | 2019.06.04 |
| [WEB] 1.CheckBox 상태에 따른 안내메시지 및 이미지 출력 (0) | 2019.06.04 |