반응형
반응형

1. 개요

 maven 프로젝트에 스프링 시큐리티를 적용하던 도중, 특정 bean이 주입되지 않아 NullPointException 에러가 발생했다. 참고로 해당 Bean은 xml 설정파일을 통해 등록된 상태였다.

 결론부터 말하면 문제가 발생한 Bean(SqlSession)은 WebApplicationContext로 설정되어있었고, 해당 Bean을 호출하는 Bean(SpringSecurity)은 RootApplicationContext로 설정되어 있어서 발생한 문제였다.

그렇다면 RootApplicationContext, WebApplicationContext 는 무엇이며, 어떻게 이와같이 설정이 나뉘게된 것일까?


2. RootApplicationContext와 WebApplicationContext 

2.1. RootApplicationContext

말 그대로 최상위 ApplicationContext이다.WebApplicationContext의 부모 Context이며 자식에게 자신의 설정을 공유한다. 단, 자신은 자식인 WebApplicationContext의 설정에 접근하지 못한다.


2.2. WebApplicationContext

Servlet 단위의 ApplicationContext이다. RootApplicationContext의 자식 Context이며, 부모인 RootApplicationContext의 설정에 접근할 수 있다.


아래 이미지가 이를 잘 설명해주고 있다.

출처 : https://howtodoinjava.com/spring-mvc/contextloaderlistener-vs-dispatcherservlet/


나의 경우 스프링 시큐리티 관련 객체에서 SqlSession을 Autowired 받아 DB 조회를 하는 로직을 구현하였는데, 스프링 시큐리티 설정은 RootApplicationContext으로, SqlSession은 WebApplicationContext로 설정했었다.


즉, RootApplicationContext에서 WebApplicationContext에 있는 Bean인 SqlSession을 주입하려고 했던 것이다. 당연히 접근이 되지 않아 주입이 되지 않았고, NullPointException이 발생했던 것이었다.


그렇다면 어떤 설정이 RootApplicationContext와 WebApplicationContext로 나누게 한 것일까? 그게 바로 ContextLoaderListener이다.


3. ContextLoaderListener

ContextLoaderListener는 RootApplicationContext를 생성하는 클래스이다.

빨간 블록안에 contextConfigLocation 설정파일을 읽어 RootApplicationContext를 생성한다.


참고로 파란색 블록안에 contextConfigLocation 설정파일을 읽어 생성되는 것이 WebApplicationContext이다.

web.xml

 즉, applicationContext.xml과 security-context.xml을 로드하여 RootApplicationContext를 생성하고,

 servlet-context.xml과 mybatis-context.xml을 로드하여 WebApplicationContext를 생성했다.

 결과적으로 스프링 시큐리티 관련 bean은 rootApplicationContext에, sqlSession bean은 WebApplicationContext에 설정되었으며, 스프링 시큐리티 서비스 객체(rootApplicationContext)에서 sqlSession(WebApplicationContext)를 Autowired 하지 못해 발생한 문제였다.


ContextLoaderListener 설정으로 인해 의존 주입이 되지 않아 발생한 에러임을 확인하고 ContextLoaderListener에 대해 포스팅하려고 했으나, 오히려 이 부분에 대한 설명이 적은 것 같아 아쉽다. ㅠㅠ


반응형
반응형

1. 개요

실무 투입한지 거의 1년이 다 되어갈 무렵, web.xml 코드를 보던 중 문득 이런 생각이 들었다.

'웹 애플리케이션의 첫 단추인 web.xml에 대해 누군가에게 설명할 수 있을까?'  

1년간 일은 열심히 했는데 가장 기본적인것에 대한 공부가 전혀 안되있음을 느껴, 공부 후 포스팅을 한다.

참고로 web.xml에 대한 예제는 MVC 패턴 기준으로 작성했다.


2. 정의

web.xml은 DD (Deployment Descriptor : 배포 설명자)라고 불리며, Web Application의 설정파일이다.

DD는 Web Application 실행 시 메모리에 로드된다.

즉, web.xml이란 웹 어플리케이션을 실행시킬 때 함께 올라가야할 설정(설명)들을 정의해놓은 것이다.

그렇다면 web.xml에는 어떤 설정을 할까?


3. 설정

Web.xml 에서는 크게 DispatcherServlet, ContextLoaderListener, Filter 설정을 한다.


클라이언트의 요청을 처리하는 DispatcherServlet.

웹 어플리케이션 컨텍스트 단위의 설정을 로드하는 ContextLoaderListener,

이건 꼭 거쳤으면 좋겠네. Filter.


3.1) DispatcherServlet

DispatcherServlet은 클라이언트의 요청을 전달받는 객체이다. 하는 일은? 당연히 클라이언트의 요청을 처리하는 일이다. 그럼 어떻게 처리할까?


클라이언트의 요청을 처리하려면 크게 4가지 일이 진행되어야 한다.


첫째, 클라이언트의 요청을 처리해줄 컨트롤러를 찾는다.

둘째, 컨트롤러를 실행시킨다. (비지니스 로직 처리)

셋째, 클라이언트에게 보여질 View를 찾는다.

넷째, 응답 데이터와 View를 클라이언트에게 전달한다.


요청을 처리할 컨트롤러를 찾는 일은 Handler Mapping이라는 객체가 처리한다. 이 객체는 클라이언트의 요청 경로를 이용해서 컨트롤러를 검색하고, 검색된 객체를 DispatcherServlet에게 리턴한다.

만약 클라이언트가 'http://~~/test' 를 요청할 경우 /test를 처리할 컨트롤러 객체를 리턴하는 것이다. 


컨트롤러를 실행시키는 일은 Handler Adapter라는 객체가 처리한다. 이 객체는 @Controller 어노테이션을 이용해 구현한 컨트롤러 뿐만 아니라, Controller 인터페이스를 구현한 컨트롤러, 특수 목적으로 사용되는 HttpRequestHandler 인터페이스를 구현한 클래스를 동일한 방식으로 실행할 수 있도록 만들어졌다. (출처 : 스프링5 입문. 최범균)

즉, 컨트롤러 실행 업무에 특화된 객체로 Controller를 실행하는 것이다.

Controller가 실행되면 개발자가 구현한 비지니스 로직을 거쳐 응답 데이터가 추출된다. 실행된 Controller는 리턴할 데이터와 View를 Handler Adapter에게 리턴한다.

Handler Adapter는 데이터와 view를 ModelAndView 형태로 DispatcherServlet에게 리턴한다.


여기서 view는 단순히 view의 이름이다. 뭔 소리냐면 이 이름에 해당하는 실제 view를 찾아야한다는 것이다.

클라이언트에게 보여질 view를 찾는 일은 ViewResolver 객체가 처리한다.

ViewReolver bean 객체 설정

위는 viewResolver 객체를 설정하는 부분인데 설정된 prefix(접두사), suffix(접미사)를 참조하여 처리한다.

만약 Controller에서 리턴한 view 이름이 hello였다면 /WEB-INF/view/hello.jsp를 찾아 dispatcher Servlet에게 리턴한다.


최종적으로 viewResolver가 리턴한 View 객체에 응답 데이터를 넣어 클라이언트에게 리턴한다.


이처럼 클라이언트의 요청은 DispatcherServlet라는 감독관(?)이 처리한다. 다만 직접 처리하지 않고 적절한 객체들에게 일을 위임하여 처리하고 있다.


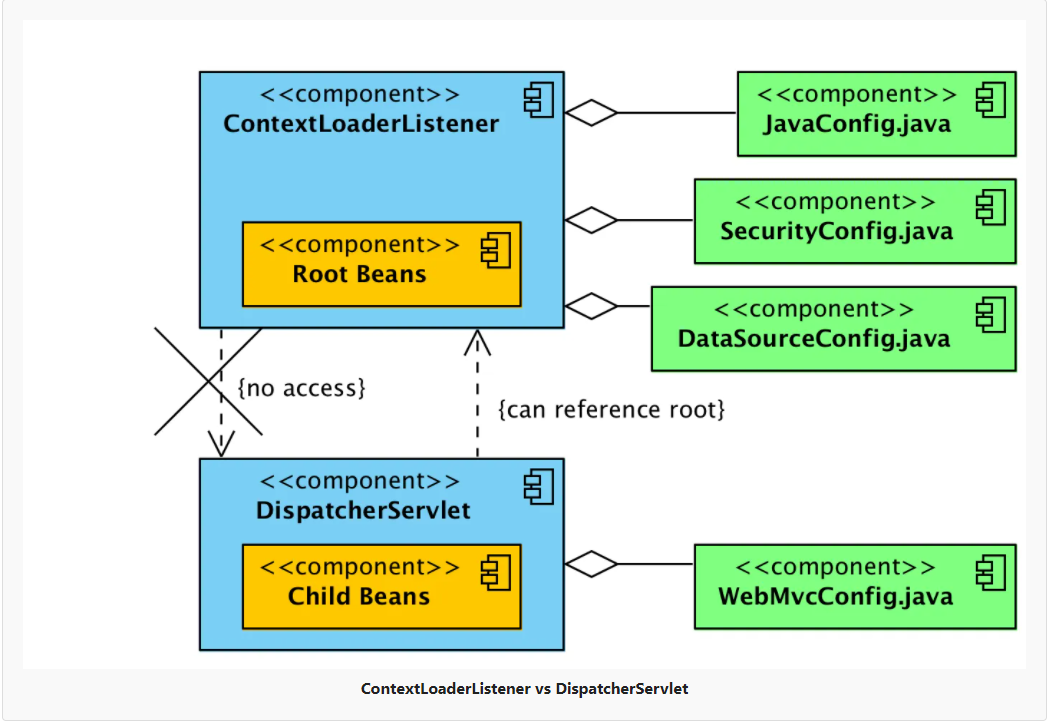
3.2) ContextLoaderListener

앞서 Dispatcher Servlet은 클라이언트의 요청을 처리하는 객체라고 설명했다. 웹 어플리케이션의 규모가 커진다면, 클라이언트의 요청또한 다양해질 것이고, 이를 처리할 Dispatcher Servlet도 늘어날 가능성이 있다. 다른 성격을 가진 서블릿이 생성될 것이고, 설정 또한 서블릿의 성격에 맞게 각각 적용시켜야 한다.

반면에, 모든 서블릿이 공통으로 가져야할 설정들도 있다. 즉 Servlet Context 단위가 아닌 Application Context 단위의 설정이 필요한데 이를 ContextLoaderListener 객체가 처리한다.

이 객체는 Application Context 단위의 설정을 생성한다.

참고로 Application Context 는 Web Application 의 Context이며, 모든 Servlet들이 참조가 가능한 부모 Context이다.


3.3) Filter

클라이언트에서 온 요청을 Dispatcher Servlet이 받기 전 거치는 부분이 있다. 바로 이 Filter 객체이다.

만약 스프링 시큐리티 필터가 적용되어 있다면, 인가 및 인증 처리를 먼저 처리하고, 인코딩 필터가 적용되어 있다면 클라이언트의 요청데이터를 인코딩하는 작업이 선 처리된 후 Dispatcher Servlet에게 필터링 된 데이터가 전달된다.


4. 예제

이제 나같은 코린이가 흔히 봤던... 그저 작성만 했던... web.xml 코드를 분석해보자


4.1) web.xml

1
2
3
4
5
6
7
8
9
10
11
12
13
14
15
16
17
18
19
20
21
22
23
24
25
26
27
28
29
30
31
32
33
34
35
36
37
38
39
40
41
42
43
44
45
46
47
48
49
50
51
52
<?xml version="1.0" encoding="UTF-8"?>
<web-app version="2.5" xmlns="http://java.sun.com/xml/ns/javaee"
 xmlns:xsi="http://www.w3.org/2001/XMLSchema-instance"
 xsi:schemaLocation="http://java.sun.com/xml/ns/javaee https://java.sun.com/xml/ns/javaee/web-app_2_5.xsd">
 
 <!-- Dispatcher Servlet 생성 -->
 <servlet>
     <servlet-name>myDispatcherServlet</servlet-name>
     <servlet-class>org.springframework.web.servlet.DispatcherServlet</servlet-class>
     <init-param>
         <param-name>contextConfigLocation</param-name>
         <param-value>classpath:/config/servlet-config.xml</param-value>
     </init-param>
     
     <load-on-startup>1</load-on-startup>
 </servlet>
 <servlet-mapping>
     <servlet-name>myDispatcherServlet</servlet-name>
     <url-pattern>/</url-pattern>
 </servlet-mapping>
 
 <!-- web application context -->
 <listener>
     <listener-class>org.springframework.web.context.ContextLoaderListener</listener-class>
 </listener>
 <context-param>
     <param-name>contextConfigLocation</param-name>
     <param-value>
         /WEB-INF/config/application-context.xml
     </param-value>
 </context-param>
 
 <!-- Encoding Filter 생성 -->
 <filter>
     <filter-name>encodingFilter</filter-name>
     <filter-class>
         org.springframework.web.filter.CharacterEncodingFilter
     </filter-class>
     <init-param>
         <param-name>encoding</param-name>
         <param-value>UTF-8</param-value>
     </init-param>
     <init-param>
         <param-name>forceEncoding</param-name>
         <param-value>true</param-value>
     </init-param>
 </filter>
 <filter-mapping>
     <filter-name>encodingFilter</filter-name>
     <url-pattern>/*</url-pattern>
 </filter-mapping>
</web-app>
cs

분석 전 다시 되새겨보겠다.

첫째, web.xml은 DD(Deploy Descriptor, 배포 설명자)이다.

둘째, DD는 Web Application 실행 시 메모리에 로드된다.

셋째, web.xml에는 크게 dispatcherServlet, contextLoaderListener, filter 를 설정한다.


만약 tomcat이라는 WAS(Web Application Server)를 통해 이 web Application을 실행시킨다고 가정하면, web.xml 파일에 설정한 내용들이 메모리에 로드될 것이다.


본격적으로 코드를 분석해보자.


7 ~ 16 line - 클라이언트의 요청을 처리하는 Dispatcher Servlet을 myDispatcherServlet이란 이름으로 생성하고, 이 서블릿에 대한 설정파일로 servlet-config.xml을 지정한다. (controller 스캔용, 코드는 글의 최하단에 첨부)


17 ~ 20 line - 설정한 Dispatcher Servlet이 처리할 url-pattern을 설정한다. '/' 경로로 들어오는 모든 요청에 대해서 myDispatcherServlet이 처리를 담당한다.


23 ~ 31 line - web application context 단위의 설정파일로 application-context.xml을 설정한다. 이 설정은 servelt으로 생성한 myDispatcherServlet에게 공유된다. (view-resolver 설정용, 코드는 글의 최하단에 첨부)


34 ~ 47 line - 스프링에서 지원하는 encoding Filter를 filter에 추가한다.


48 ~ 51 line - encoding Filter가 처리할 url-pattern을 설정한다. '/*' 모든 경로에 대해 인코딩 필터를 적용한다.


정리하면 이 예제 web.xml은 클라이언트의 요청을 처리할 인코딩 필터와 Dispatcher Servelt을 생성하고, view Resolver를 web application context 단위로 설정하였다.


> servlet-config.xml

1
2
3
4
5
6
7
8
9
10
11
12
<?xml version="1.0" encoding="UTF-8"?>
<beans xmlns="http://www.springframework.org/schema/beans"
    xmlns:xsi="http://www.w3.org/2001/XMLSchema-instance"
    xmlns:context="http://www.springframework.org/schema/context"
    xsi:schemaLocation="http://www.springframework.org/schema/beans http://www.springframework.org/schema/beans/spring-beans.xsd
        http://www.springframework.org/schema/context http://www.springframework.org/schema/context/spring-context-4.3.xsd">
 
 
    <context:component-scan base-package="controller"/>
    
</beans>
 
cs


> application-context.xml

1
2
3
4
5
6
7
8
9
10
11
<?xml version="1.0" encoding="UTF-8"?>
<beans xmlns="http://www.springframework.org/schema/beans"
    xmlns:xsi="http://www.w3.org/2001/XMLSchema-instance"
    xsi:schemaLocation="http://www.springframework.org/schema/beans http://www.springframework.org/schema/beans/spring-beans.xsd">
 
    <bean id="viewResolver" class="org.springframework.web.servlet.view.InternalResourceViewResolver">
        <property name="prefix" value="/WEB-INF/view/"/>
        <property name="suffix" value=".jsp"/>
    </bean>
</beans>
 
cs


반응형
반응형

목차

1. Ajax란

2. 실습 환경

3. 웹 페이지 생성

4. Servlet 생성

5. web.xml 설정

6. 정리

7. 출력 화면


1. Ajax란 (출처 - 위키백과)

 기존의 웹 애플리케이션은 폼을 채우고 이를 제출(submit)하면 웹 서버는 요청된 내용에 따라서 데이터를 가공하여 새로운 웹 페이지를 작성하고 응답으로 되돌려준다. 이때 최초에 폼을 가지고 있던 페이지와 결과물로써 되돌려 받은 페이지는 일반적으로 유사한 내용을 가지고 있는 경우가 많다. 결과적으로 중복되는 HTML 코드를 다시 한번 전송을 받음으로써 많은 대역폭을 낭비하게 된다. 이는 금전적 손실을 야기할 수 있으며 사용자와 대화하는 서비스를 만들기 어렵게도 한다.

 반면에 Ajax는 필요한 데이터만을 웹 서버에 요청해서 받은 후 클라이언트에서 데이터에 대한 처리를 할 수 있다. 웹 서버에서 전적으로 처리되던 데이터 처리의 일부분이 클라이언트 쪽에서 처리되므로 웹 브라우저와 웹 서버 사이에 교환되는 데이터량과 웹 서버의 데이터 처리량도 줄어들기 때문에 애플리케이션의 응답성이 좋아진다.


 장점

  - 페이지 이동없이 고속으로 화면을 전환할 수 있다.

  - 서버 처리를 기다리지 않고, 비동기 요청이 가능하다.

  - 수신하는 데이터 양을 줄일 수 있고, 클라이언트에게 처리를 위임할 수도 있다.


 단점

  - Ajax를 쓸 수 없는 브라우저에 대한 문제가 있다.

  - HTTP 클라이언트의 기능이 한정되어 있다.

  - 동일-출처 정책으로 인해 다른 도메인과는 통신이 불가능하다.


2. 실습 환경

 - 이클립스

 - jquery-3.4.1

 - tomcat 7.0

  프로젝트 생성 및 tomcat 서버 설정을 마쳤다는 가정 하에 ajax 통신을 하였다.


3. 웹 페이지 생성

 먼저 사용자가 어떠한 입력을 수행할 수 있도록 html과 javascript를 사용하여 웹 페이지를 생성한다. 아래와 같이 ajax폴더에 파일들을 넣어줬다.

웹 페이지 생성


 3.1) ajaxCommunication.html

1
2
3
4
5
6
7
8
9
10
11
12
13
14
15
16
17
18
<!DOCTYPE html>
<html>
<head>
<meta charset="utf-8">
<title>Insert title here</title>
<script type="text/javascript" src = "ajax/jquery-3.4.1.js"></script>
<script type="text/javascript" src = "ajax/ajaxCommunication.js"></script>
</head>
<body>
    <h2>Ajax Communication</h2>
    이름 : <input type="text" id = "ajaxConName"/>
    나이 : <input type="text" id = "ajaxConAge"/>
    <br>
    <input type="button" id = "ajaxConGetButton" value ="Get통신">
    <input type="button" id = "ajaxConPostButton" value ="Post 통신">
    <div id="myDiv"></div>
</body>
</html>
 

 Get, Post 방식의 통신을 구현하기 위해 두 개의 버튼을 생성하였다.


 3.2) ajaxCommunication.js

1
2
3
4
5
6
7
8
9
10
11
12
13
14
15
16
17
18
19
20
21
22
23
24
25
26
27
28
29
30
31
32
33
34
35
36
37
38
39
40
41
42
43
44
45
46
47
48
49
50
51
52
53
54
55
56
57
58
59
60
61
$(document).ready(function(){
    $('#ajaxConGetButton').click(function(){
        AjaxConGet();
    })
    
    $('#ajaxConPostButton').click(function(){
        AjaxConPost();
    })
    
})
 
function AjaxConGet(){
    var url = "http://localhost:8080/test/ajaxCon";
    $.ajax({
        type:"GET",
        url:url,
        dataType:"html",
        data:{
            name : $('#ajaxConName').val(),
            age : $('#ajaxConAge').val()
        },
        success : function(data){
            alert('ajax GET 통신 성공');
            var $div = $('<div></div>');
            var text = document.createTextNode(data);
            $div.append(data);
            $div.appendTo($('#myDiv'))
        
        },
        error : function(request,status,error){
            alert('code:'+request.status+"\n"+"message:"+request.responseText+"\n"+"error:"+error); //에러 상태에 대한 세부사항 출력
            alert(e);
        }
    })
    
}
 
function AjaxConPost(){
    var url = "http://localhost:8080/test/ajaxCon";
    $.ajax({
        type:"POST",
        url:url,
        dataType:"html",
        data:{
            name : $('#ajaxConName').val(),
            age : $('#ajaxConAge').val()
        },
        success : function(data){
            alert('ajax POST 통신 성공');
            var $div = $('<div></div>');
            var text = document.createTextNode(data);
            $div.append(data);
            $div.appendTo($('#myDiv'))
        },
        error : function(request,status,error){
            alert('code:'+request.status+"\n"+"message:"+request.responseText+"\n"+"error:"+error); //에러 상태에 대한 세부사항 출력
            alert(e);
        }
    })
    
}
 

 1 ~ 10 : 페이지가 로드되면 위에서 생성했던 두 개의 버튼에 대해 click 이벤트를 부여한다.


 12 : Get 방식으로 Ajax와 통신을 시도하는 함수이다.


 13 : 통신을 하고자하는 url을 입력한다. ~~test/ajaxCon으로 설정했는데, ajaxCon은 web.xml에서 설정한 서블릿의 url이다.


 15 ~ 21 : 통신 방식과 통신할 url, 수신할때의 데이터 타입, Servlet으로 보낼 데이터 정보를 넣어준다. dataType은 서블릿에서 객체 형식이나 두개 이상의 데이터를 송신할 경우 "json"을, 하나의 문장으로 송신할 경우 "html"을 넣어준다. 필자는 out.print()로 하나만 보내기 때문에 html로 해주었다.


 22 ~ 27 : Servlet과의 모든 통신이 정상적으로 끝나면 메서드의 매개변수 안에 Servlet이 response 한 데이터가 있게 된다. 이를 출력하기 위해 div태그에 응답 정보가 들어있는 textNode를 상속시키고, 이를 초기 HTML 코드로 생성했던 div 태그에 상속시킨다.


 30 ~ 32 : Servlet과의 통신 실패 시 에러 코드 및 내용에 대한 세부사항을 출력시킨다. 만일 에러 코드가 200이 나올 경우 dataType에 대한 수정이 필요하다.


 38 ~ 57 : type을 GET에서 POST로만 변경한 코드이다.


4. Servlet 생성

 패키지를 myServlet으로 설정하고 Servlet 이름은 Serv로 하였다. web.xml에서 url과 Servlet을 매핑할 것이기 때문에 WebServlet()을 주석처리하였다.


Serv.java

1
2
3
4
5
6
7
8
9
10
11
12
13
14
15
16
17
18
19
20
21
22
23
24
25
26
27
28
29
30
31
32
33
34
35
36
37
38
39
40
41
42
43
44
45
46
47
48
49
50
51
52
53
54
55
56
package myServlet;
 
import java.io.IOException;
import javax.servlet.ServletException;
import javax.servlet.annotation.WebServlet;
import javax.servlet.http.HttpServlet;
import javax.servlet.http.HttpServletRequest;
import javax.servlet.http.HttpServletResponse;
import java.io.PrintWriter;
/**
 * Servlet implementation class Serv
 */
//@WebServlet("/ajaxCon")
public class Serv extends HttpServlet {
    private static final long serialVersionUID = 1L;
       
    /**
     * @see HttpServlet#HttpServlet()
     */
    public Serv() {
        super();
        // TODO Auto-generated constructor stub
    }
 
    /**
     * @see HttpServlet#doGet(HttpServletRequest request, HttpServletResponse response)
     */
    protected void doGet(HttpServletRequest request, HttpServletResponse response) throws ServletException, IOException {
        // TODO Auto-generated method stub
        response.setContentType("application/x-json; charset=UTF-8");
        PrintWriter out = response.getWriter();
        String name = request.getParameter("name");
        String age = request.getParameter("age");    
        
        System.out.println("doget :"+name);
        System.out.println("deget :"+age);
            
        out.print("Get 통신 : 안녕 내 이름은 "+name+"이고 나이는 "+age+"란다"); //response    
    }
 
    /**
     * @see HttpServlet#doPost(HttpServletRequest request, HttpServletResponse response)
     */
    protected void doPost(HttpServletRequest request, HttpServletResponse response) throws ServletException, IOException {
        // TODO Auto-generated method stub
        response.setContentType("application/x-json; charset=UTF-8");
        PrintWriter out = response.getWriter();
        String name = request.getParameter("name");
        String age = request.getParameter("age");    
        
        System.out.println("doget :"+name);
        System.out.println("deget :"+age);
            
        out.println("Post통신 : 안녕 내 이름은 "+name+"이고 나이는 "+age+"란다"); //response
    }
}
 

 9 : ajax로 데이터를 전송하기 위한 메서드인 java.io.PrintWrite를 import 하였다.


 28 : GET 방식으로 통신할 때의 함수이다.


 30 : ajax로 보낼 데이터의 charset을 utf-8로 설정한다. 이 부분이 없을 시 한글이 깨져서 출력될 수 있다.


 32 ~ 33 : ajax에서 보낸 name과 age를 읽어 들인다.


 38 : 위와 같은 형태로 데이터를 가공하여 ajax에게 전송한다.


 44 ~ 54 : POST 방식으로 통신할 때의 함수이다.


5. web.xml 설정

 web.xml은 루트 경로로 진입 시 가장 먼저 읽어오는 파일을 설정하거나 WAS에게 줄 Servlet 정보를 설정하고 url을 매핑하는 역할을 한다.


web.xml

1
2
3
4
5
6
7
8
9
10
11
12
13
14
15
16
17
18
19
20
21
22
23
24
<?xml version="1.0" encoding="UTF-8"?>
<web-app xmlns:xsi="http://www.w3.org/2001/XMLSchema-instance" xmlns="http://java.sun.com/xml/ns/javaee" xsi:schemaLocation="http://java.sun.com/xml/ns/javaee http://java.sun.com/xml/ns/javaee/web-app_3_0.xsd" id="WebApp_ID" version="3.0">
  <display-name>test</display-name>
  <welcome-file-list>
    <welcome-file>ajax/ajaxCommunication.html</welcome-file>  <!-- 루트경로 진입시 가장먼저 읽어오는 파일 -->
    <welcome-file>index.html</welcome-file>
    <welcome-file>index.htm</welcome-file>
    <welcome-file>index.jsp</welcome-file>
    <welcome-file>default.html</welcome-file>
    <welcome-file>default.htm</welcome-file>
    <welcome-file>default.jsp</welcome-file>
  </welcome-file-list>
  <servlet>
  <!-- 서블릿을 불러오기 위해 WAS에게 주는 정보 -->
  <!-- 1. 배포할 Servlet 2. 해당 Servlet 매핑 URL -->
      <servlet-name>ajaxCon</servlet-name>
      <servlet-class>myServlet.Serv</servlet-class>
  </servlet>
  
  <servlet-mapping>
      <servlet-name>ajaxCon</servlet-name>
      <url-pattern>/ajaxCon</url-pattern>
  </servlet-mapping>
</web-app>


 5 : <welcome-file> 태그는 루트 경로 진입 시 가장 먼저 읽어오는 파일이다. 읽어올 수 없을 시 순차적으로 아래 입력된 파일을 읽어온다. root경로에서 서버를 돌릴 시 ajaxCommunication.html 파일이 가장 처음 로드되도록 하였다. 그 아래는 기본적으로 입력되어 있는 파일이다.


 13 ~ 18 : WAS가 Servlet을 정상적으로 로드하기 위해 WAS에게 주는 Servlet과 url 정보이다. <servlet-name>은 <servlet-mapping>에서 동일한 name을 가진 정보와 매핑시키기 위한 이름이다. 현재 myServlet.Serv(클래스명.서블릿명) 파일을 '/ajaxCon' 이라는 url과 매핑시켰다. 이로써 '~~test/ajaxCon' url로 접속할 시 Serv 파일이 로드된다.


6. 정리

 이렇게 설정하면 ajax 통신이 정상적으로 이루어진다. 과정을 정리하자면


 1) 서버를 실행하면 web.xml에서 정의한 파일인 'ajax/ajaxCommunication.html'를 로드하고, WAS에게 서블릿 파일과 url 정보를 알려준다.


 2) HTML 파일에서 버튼을 클릭하게 되면 입력한 url과 ajax 통신을 시도하게 된다. url이 web.xml에서 설정한  ~~test/ajaxCon로 설정되었기 때문에 '/ajaxCon'과 매핑된 Serv 서블릿과 통신을 시도하게 된다.


 3) Servlet에서 데이터를 받은 후 가공하여 송신한다.


 4) ajax는 웹 페이지에 가공된 데이터를 출력시킨다.


 7. 출력 화면

통신 성공 화면


반응형

+ Recent posts